For steps on how to activate a new number,click here
Make sure you take note of the new number.
Leave the customer’s original SIM in their phone.
Step 1 - Start a number swap on the new SIM
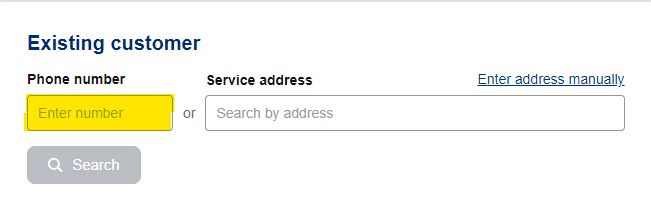
Search for the newly activated number
Under ‘existing customer’, enter the number for the SIM you just activated, then click ‘Search’
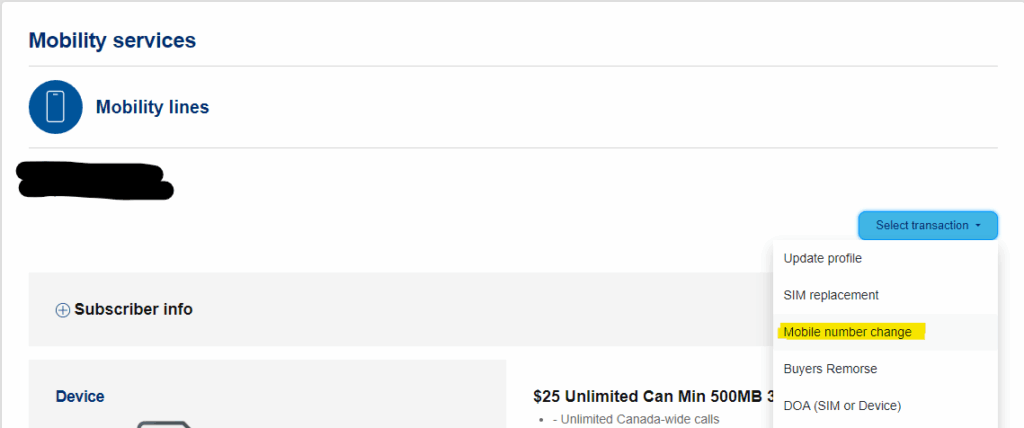
Start a Mobile number change
Once in the customer account for the Lucky SIM, expand the menu under ‘Select Transaction’ and click ‘Mobile number change’
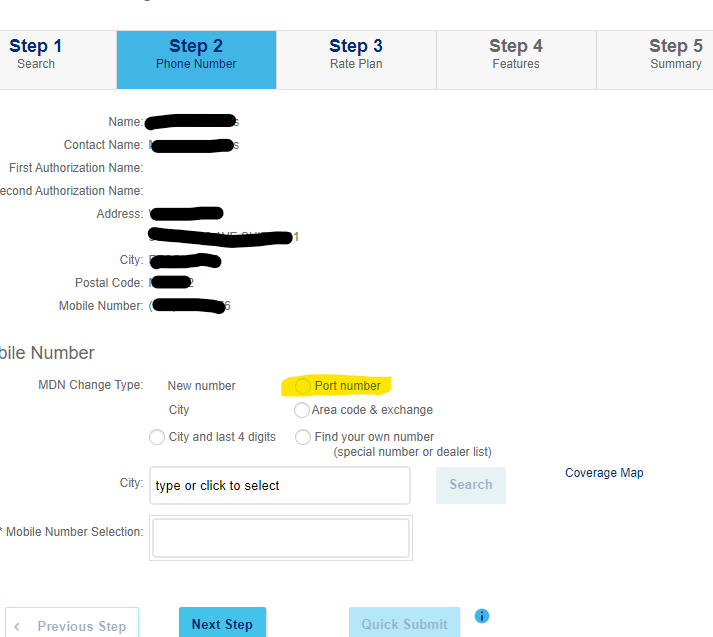
Begin the port request
Under MDN Change Type, select ‘Port Number’ (highlighted yellow).
The webpage will reload with options different than the ones pictured.
Once this has happened, continue to Step 2
Step 2 - Process the Port Request
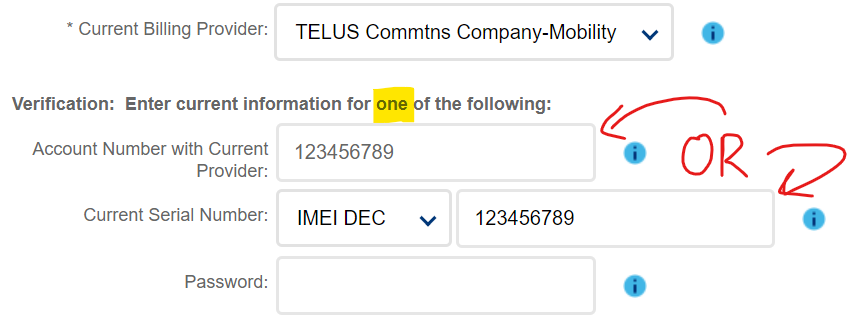
Verify account ownership
Enter ONLY ONE of the following:
Account number (from the previous carrier)
Current phone’s IMEI DEC (can be found by dialing *#06#)
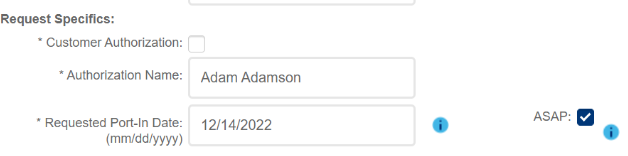
Authorize the port request
Check the Customer Authorization box
Under ‘Authorization Name’ enter the customer’s name (as it appears on their old account)
Check the ‘ASAP’ box
Step 3 - Confirm port request
Your customer will receive a text message from their old carrier asking to authorize the port request.
Respond to the text with the appropriate message to approve
Once the customer has authorized the Port Over, you may continue through the steps and submit. Pay attention to the following warning messages, which indicate issues with the port request.
Once the request has been submitted and the port has been authorized via text, you may swap to the new Lucky SIM.
The port is now complete!
New Numbers
Step 0 - Customer Address
Enter your client’s address in the searchbar and click the right one from the autofill
Click ‘Search‘
On the new page, under ‘Mobility Services‘, click ‘Add‘
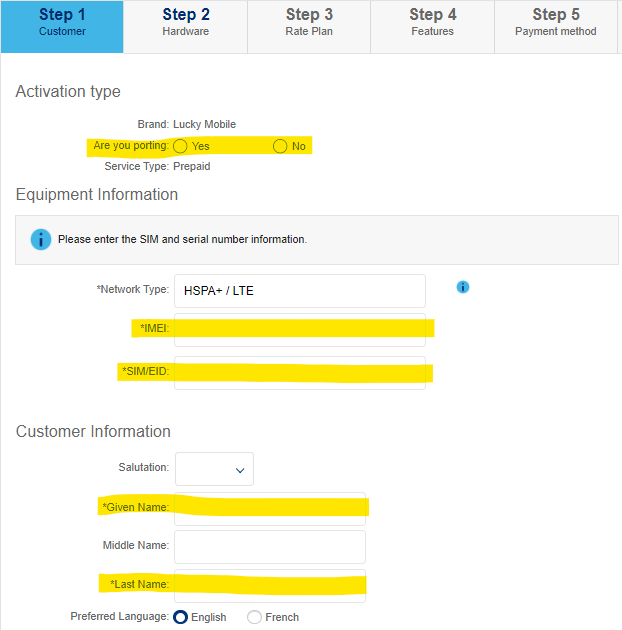
Step 1 - Customer Details
You only need to fill out the fields we have highlighted in yellow!
Are you porting: No
IMEI: 111111111111119 (thats fourteen 1s and one 9)
(Pro tip – print our Cheat Sheet for a QR code to scan this number quickly!)
SIM/EID: Using your scanner, scan the long barcode on the back of the Lucky SIM
Given Name: The customer’s first name
Last Name: The customer’s last name
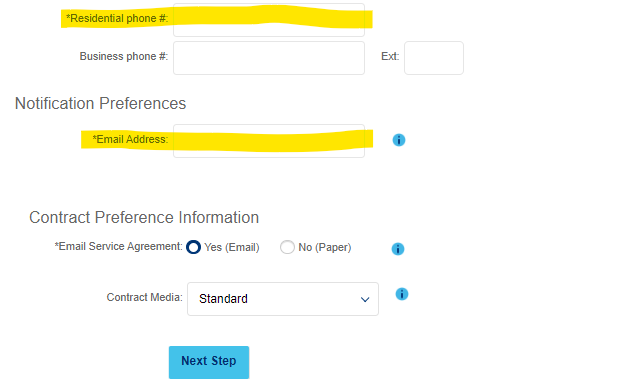
Residential phone #: The customer’s home phone number, or 111-111-1111
Once those fields have been completed, click ‘Next Step’
Step 2 - Choose a Number
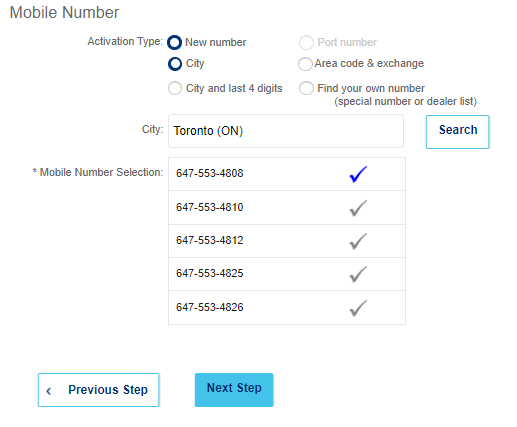
In the City field, enter the closest city to your store’s location.
Click ‘Search’
Select one of the five numbers offered to you (blue check indicates selected)
Once your customer agrees to the number, click ‘Next Step’
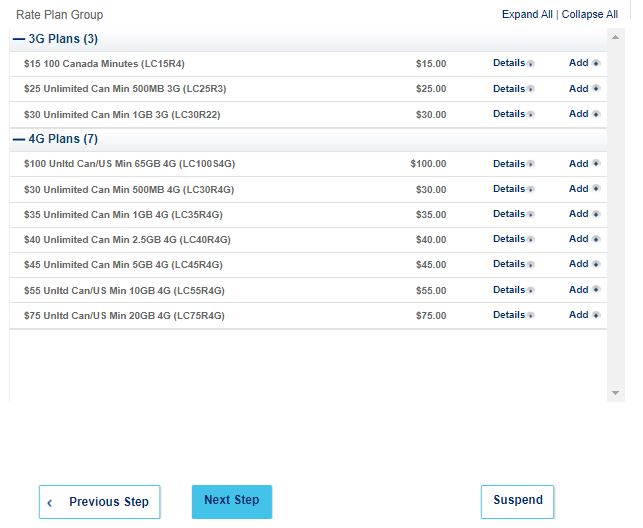
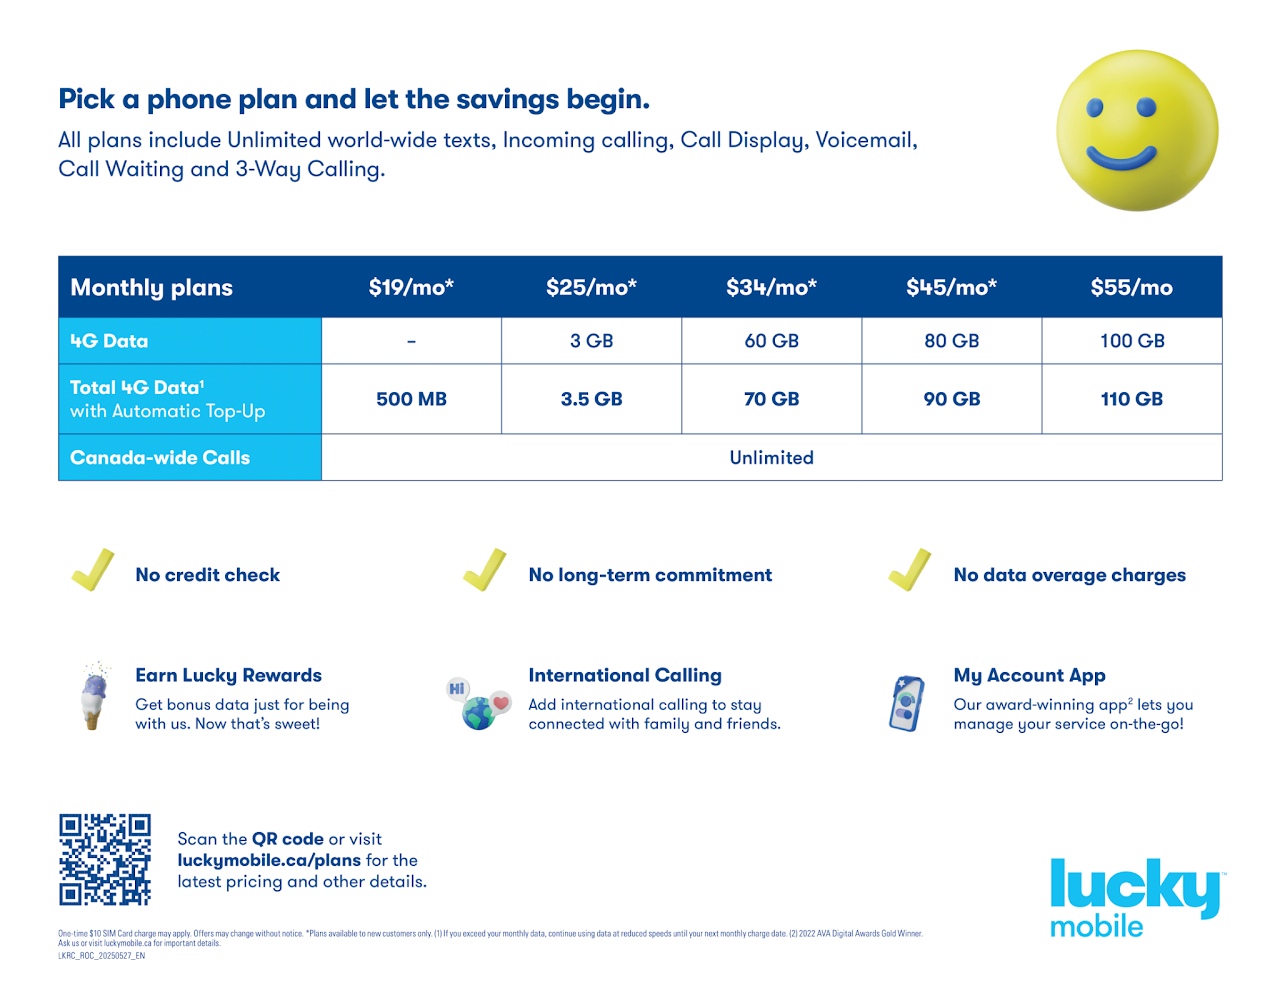
Step 3 - Choose a Plan
To help your customer decide on a plan, show them the Plan Grid!
Expand the section of your customer’s chosen plan (3G or 4G)
Click ‘Add‘ on the desired plan. You should see the word grey-out once added
Review the plan details with your customer and ask them to confirm their choice
Once your customer confirmsthe plan choice, click ‘Next Step’
Once your customer agrees to the number, click ‘Next Step’
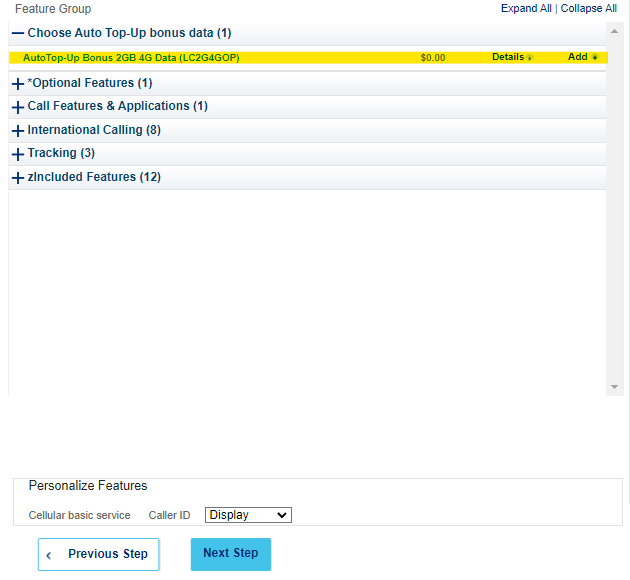
Step 4 - Extra Features
The main feature on this page is Auto Top-Up (highlighted yellow)
Auto Top-Up rewards customers with extra monthly data for providing a credit card on file. That credit card will be automatically charged the price of their plan every month.
If the customer wants Auto Top-Up, click ‘Add’
If the cusomer does not want Auto Top-Up, do not click anything
Once the above has been completed, click ‘Next Step’
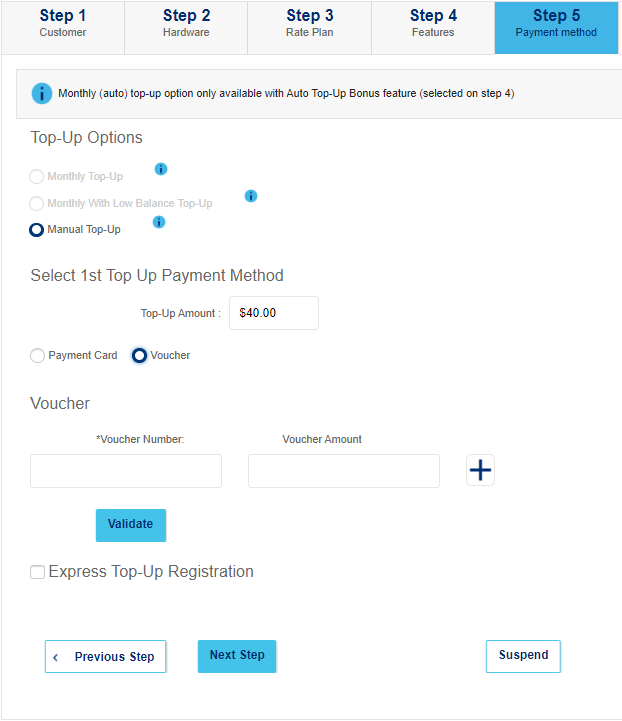
Step 5 - Account Top-Up
Select Voucher as payment method
Print voucher(s) equal to the price of the plan
(You can print vouchers from Web Store, if you have an account!)
Enter the PINs of the vouchers under ‘Voucher Number’ (click the + if you have more than one to add)
Click ‘Validated’ to ensure the PINs are valid
Once the vouchers have been validated, click ‘Next Step’
Step 6 - Account Summary
Review the plan
If all looks good, click ‘Submit – Electronic Signature’
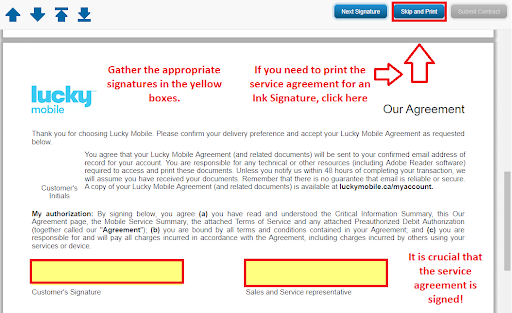
Customer signature on agreement
Sign digitally or click ‘Skip and Print’ for a physical copy
Final review
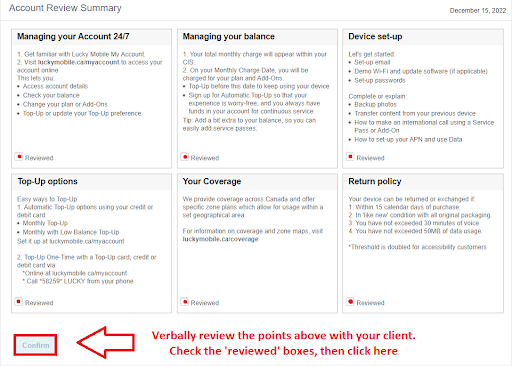
Check all the boxes, then click ‘Confirm’
Remove the SIM from the client’s phone, restart the device, insert the Lucky SIM, and the process is complete!
eSIM Activation Guide
** Before attempting to activate the eSIM **
Please ensure that your customer’s device has eSIM capabilities. Lists (click here) of compatible devices can be found online
Step 0 - Customer Address
Enter your client’s address in the searchbar and click the right one from the autofill
Click ‘Search‘
On the new page, under ‘Mobility Services‘, click ‘Add‘
Step 1 - Customer Details
You only need to fill out the fields we have highlighted in yellow!
Are you porting: No
IMEI: The phone’s IMEI 2
(both can be found by dialing *#06#)
(Pro tip – print our Cheat Sheet for a QR code to scan this number quickly!)
SIM/EID: the phone’s EID (can be found by dialing *#06#)
Given Name: The customer’s first name
Last Name: The customer’s last name
Residential phone #: The customer’s home phone number, or 111-111-1111
Once those fields have been completed, click ‘Next Step’
Step 2 - Choose a Number
In the City field, enter the closest city to your store’s location.
Click ‘Search’
Select one of the five numbers offered to you (blue check indicates selected)
Once your customer agrees to the number, click ‘Next Step’
Step 3 - Choose a Plan
To help your customer decide on a plan, show them the Plan Grid!
Expand the section of your customer’s chosen plan (3G or 4G)
Click ‘Add‘ on the desired plan. You should see the word grey-out once added
Review the plan details with your customer and ask them to confirm their choice
Once your customer agrees to the number, click ‘Next Step’
Step 4 - Extra Features
The main feature on this page is Auto Top-Up (highlighted yellow)
Auto Top-Up rewards customers with extra monthly data for providing a credit card on file. That credit card will be automatically charged the price of their plan every month.
If the customer wants Auto Top-Up, click ‘Add’
If the cusomer does not want Auto Top-Up, do not click anything
Once the above has been completed, click ‘Next Step’
Step 5 - Account Top-Up
Select Voucher as payment method
Print voucher(s) equal to the price of the plan
(You can print vouchers from Web Store, if you have an account!)
Enter the PINs of the vouchers under ‘Voucher Number’ (click the + if you have more than one to add)
Click ‘Validated’ to ensure the PINs are valid
Once the vouchers have been validated, click ‘Next Step’
Step 6 - Account Summary
Review the plan
If all looks good, click ‘Submit – Electronic Signature’
Customer signature on agreement
Sign digitally or click ‘Skip and Print’ for a physical copy
Final review
Check all the boxes, then click ‘Confirm’
Step 7 - Activate the eSIM
Scan this QR code using the Camera app on the client’s phone and complete the prompts that appear to finish activating the eSIM.
Frequently Asked Questions
Login Errors
When I log in I get the 'Oops' error. How do I fix this?
If the issue persists, please contact us for assistance.
When I log in I get the 'Account Locked' error. How do I fix this?
There are two reasons your account may be locked…
You have tried logging in with the wrong password 3 times.
Your password has passed it’s expiry date without being reset.
In both of these cases, you will need to contact us for a new password.
I've gotten a new PC or swapped the hard drive on my old one - why can't I login
Every PC you would like to access the Lucky portal from will need to be licensed separately for us.
Please contact us to request a new license.
Account
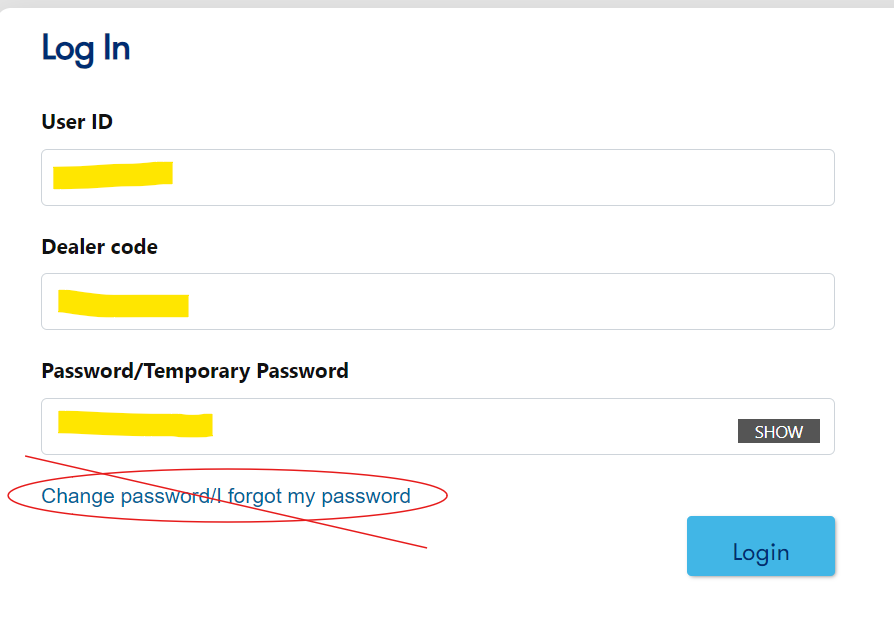
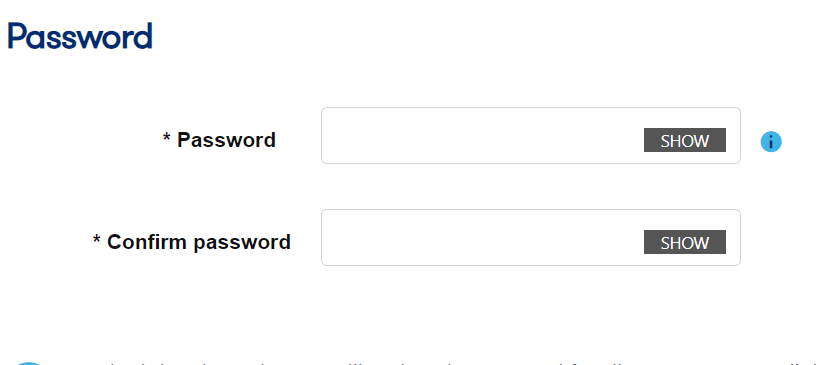
How do I reset my password?
Watch this video demonstration to see how to change your Lucky portal password
I'm running low on SIMs - how do I order more?
We normally keep track of your on hand inventory by subtracting the amount you’ve activated by the amount we’ve shipped you, and will automatically send you replenishment orders when your balance is low.
If for some reason your inventory runs low, please submit a request using our Order SIMs form.
I have a PC activation code - how do I register my PC?
If you have not received an authorization code, please contact us.
Billing Inquires
When will I receive my commissions?
Commissions for activations are paid out by the month, arriving in your account ~45 days after the month of activation.
For example, you would receive your commission payment for all activations in the month of January on (or around) March 15th.
Why am I seeing adjustments on my statements?
If a new customer does not Top-Up for a second month, or is ported out within the first 30 days, the value of the account will be subtracted from your statement.
To prevent this, avoid porting over your Lucky Mobile customers.
WebSocket Restart
Fixes both the ‘Access Denied. Only Authorized machines can access this site ‘ and the ‘Oops! ‘ error.
Step One
Close all browser tabs.
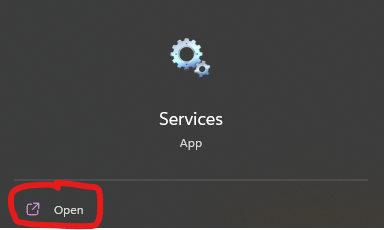
Press the Start button and search for ‘Services’.
Step Two
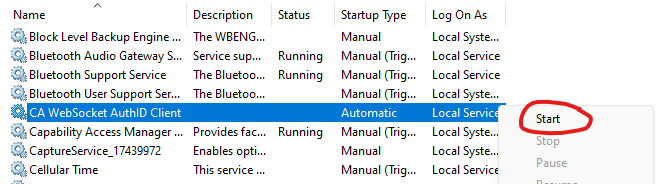
Search for ‘CA Websocket AuthID Client’.
Right click, and press Start.
You should be able to login to the portal after these two steps.
If you are still having issues, feel free to contact us for assistance!
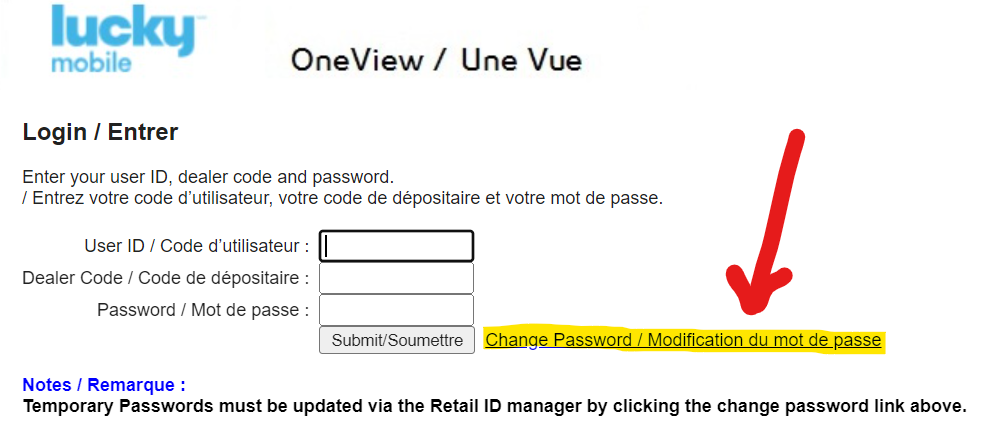
Change Password
Steps to reset your OneView password.
Passwords for the Lucky Activation portal require a reset every 90 days. If you fail to reset your password, your account will become locked.
If your account is already locked, please contact us using the info at the bottom of the page.


